
Creative Memories National Scrapbook Day
National Scrapbook Day is coming up the first weekend in May – it’s a great time to celebrate the joy of memory keeping and I hope you have the opportunity to take part in a local crop or retreat with your favorite crafting friends! If you are in the Seattle, WA area, my NSD event is Saturday, May 16th from 10am to 10pm in Bothell.
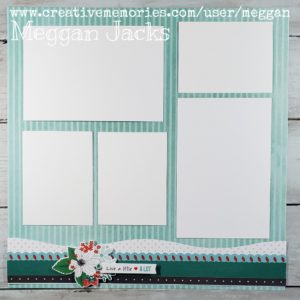
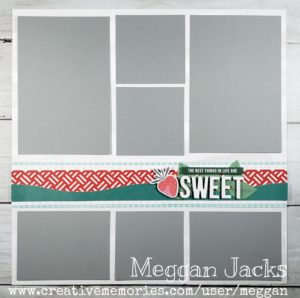
Creative Memories has released a fun page kit for 2020 National Scrapbook Day. The strawberry themed page kit features papers with lovely shades of minty blues and greens. The kit includes two sheets of cardstock – one in aqua and the other in the new shade of red – scarlet and a sheet of stickers. Also included is the cutting guide to make two, 2-page layouts. The kit is available from your favorite Creative Memories advisor, or you can email me for info on how to obtain one if you do not have an advisor already.
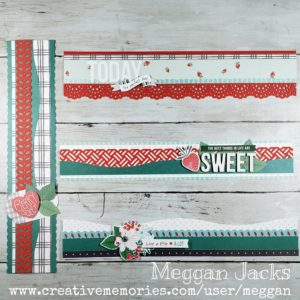
The project I want to share today with you is 4 scrapbook page borders made from the Creative Memories 2020 National Scrapbook Day Page Kit. You will also need the bonus embellishment pack available through your advisor. These four borders use less than 1/2 sheet of designer paper and cardstock, so you will have quite a bit of material left over.
Items needed:
- Creative Memories 2020 NSD Page Kit
- Creative Memories 2020 Embellishments
- Spring Leaf Border Maker Cartridge
- Lace Trim Border Punch
- Basket Weave Border Punch
- 12 inch Decorative Trimmer
- 12 inch Rotary Trimmer (straight, scallop and wavy blades)
- Adhesive
- Foam Dots
National Scrapbook Day Border #1 – Berry Sweet
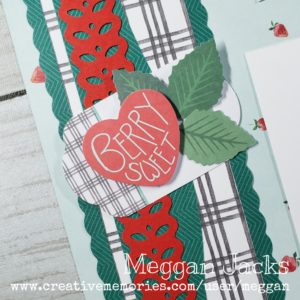
1. Scarlet Cardstock – punch a border with the Spring Leaf Border Maker Cartridge
2. Dark Teal Chevron Paper – Using Decorative Trimmer, cut a 1 inch border. Use repositionable adhesive to secure scarlet cardstock border to top.
3. Black & White Plaid paper – Using 12 inch rotary trimmer, cut a 2 inch strip with straight blade. Affix dark teal border from step 2 to the border, leaving just over 1/8th of an inch on left side exposed.
4. Dark Teal Chevron Paper – Using 12 inch rotary trimmer with SCALLOP blade cut a 1 inch border with scallop on both sides. Trim this strip in half to end up with two, 1/2 inch borders. Using tape runner, affix these to either side of the B&W plaid paper on the back side, exposing about 1/4 of an inch as shown in picture.
5. Using the “Berry Sweet” heart, one of leaf trio and the plaid scalloped tag embellishments to create a title tag. Use foam dots to add dimension. Affix to border.
National Scrapbook Day Border #2 – Live a Little, Love a Lot
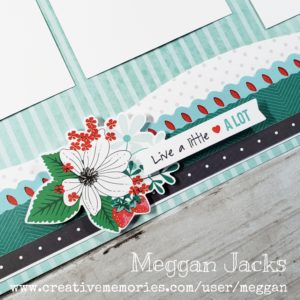
1. Gray dotted paper – using 12 inch decorative trimmer, cut a 2 inch border.
2. Aqua Cardstock – use Spring Leaf Border Maker Cartridge to make a border strip.
3. Scarlet Cardstock – trim 1 inch strip and adhere to back side of Spring Leaf Border.
4. Dark Teal Cardstock – Use 12 inch rotary trimmer with wave blade to trim 7/8th in border. Layer on top of aqua Spring Leaf border so that only one side of the border is exposed, as shown. Affix to Gray dotted border strip.
5. Affix gray border sticker to bottom of border, leaving about 1/16th inch white border exposed.
6. Use foam dots to layer and adhere stickers as shown.
National Scrapbook Day Border #3 – Best Things in Life are Sweet
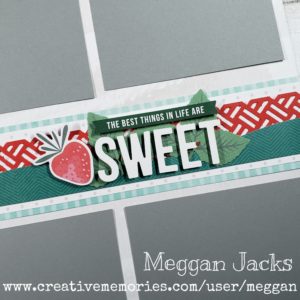
1. Mint Stripe Paper – Using rotary trimmer with straight blade, cut 2 inch border
2. Gray Dotted Paper – Trim 1 3/4 inch strip, adhere to center of mint stripe paper
3. Scarlet Cardstock – Using Basket Weave Border Punch to make a border and affix to center of other border.
4. Dark Teal Chevron Paper – use decorative trimmer to make 3/4 inch border, affix cover bottom half of scarlet basket weave punch.
5. Affix two leaf trio embellishments to border and use foam dots to affix stickers and embellishments as shown.
National Scrapbook Day Border #4 – Today the Perfect Day
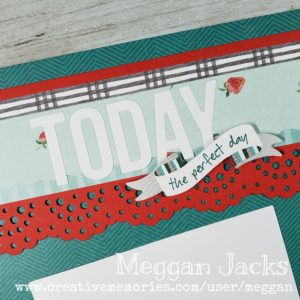
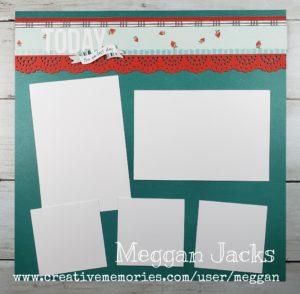
1. Scarlet Cardstock – Use Lace Trim Border Punch to make a border and trim to 2.5 inches
2. Mint Stripe Paper – Trim to 1.25 inches
3. Strawberry Paper – Trim to 1 inch, affix to top of mint stripe paper; affix to scarlet lace border as shown.
4. Plaid Paper – trim to 1/4th inch, adhere to top of border as shown.
5. Affix Stickers as shown (I recommend using foam dots to pop the letters – I didn’t and now wish I had.)

Thanks for the ideas Meggan…i’m gonna have to check it all out!